Table of Contents
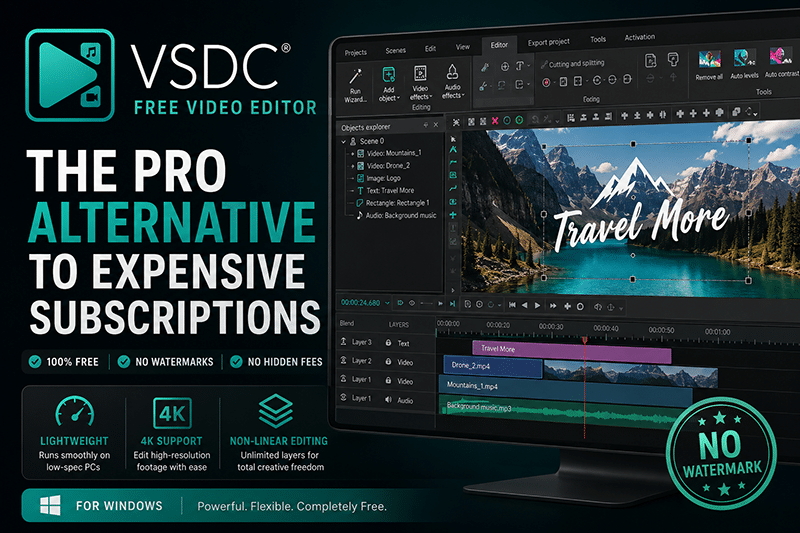
VSDC Free Video Editor: High-End Non-Linear Editing for Modest PCs
Modern content creators are trapped in a relentless cycle of recurring monthly fees. From stock asset libraries to graphic design platforms, every digital tool seems to demand a slice of your monthly income. Video editing software is traditionally the heaviest financial burden of them all. If you want advanced capabilities like color grading, masking, and motion tracking, industry-standard suites expect you to pay indefinitely.
For creators working on independent projects, side hustles, or tight operational budgets, this subscription model is a major roadblock. The alternative often feels equally frustrating: open-source programs that crash constantly, or consumer-grade apps that slap a giant watermark across your finished project unless you upgrade access to premium features.
This is the exact gap the vsdc free video editor fills. Unlike many entry-level tools that restrict access to features until you enter a credit card number, this software offers a remarkably complete, professional-grade engine entirely for free. There are no trial periods, no hidden export limits, and most importantly, no watermarks on your final files.
However, it is not a magical, flaw-free solution for everyone. To truly understand if this software fits your production pipeline, we need to look past the marketing bullet points and evaluate how it handles real-world editing stress, specific hardware limitations, and complex creative workflows.
The Non-Linear Engine: Professional Power on a Canvas
To understand why this software stands out, you have to look at how it handles video tracks. Most entry-level, free editing apps rely on a traditional linear timeline. In a linear system, clips are placed sequentially, like cars on a train track. If you want to overlay a graphic, add a picture-in-picture effect, or blend two pieces of footage together, a linear timeline quickly becomes restrictive and frustrating.
The software utilizes a true non-linear editing system (NLE). Instead of a rigid train track, think of your editing timeline as a digital canvas. Objects, video clips, audio tracks, and images can be placed anywhere on the timeline, in any order, and stacked in multiple layers as deep as your system resources can handle.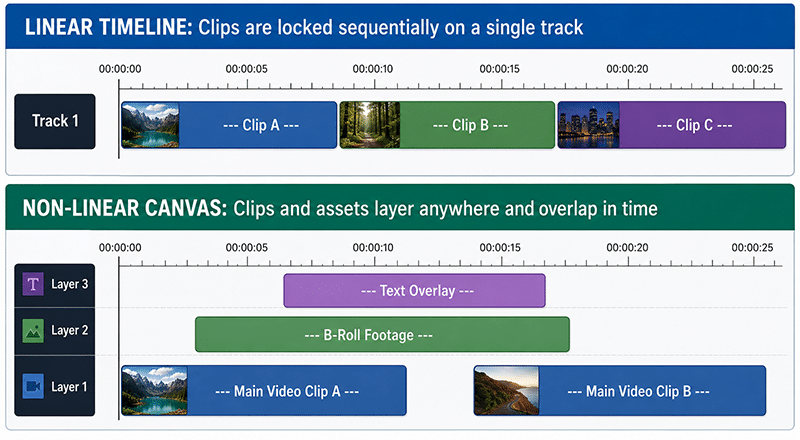
This structural architecture gives you total creative freedom. You can easily create complex split-screen effects, blend textures using double exposure, or precisely layer sound design elements directly underneath specific frames. For creators moving over from basic smartphone editing apps or simple desktop cutters, this shift opens up production techniques that were previously impossible.
Performance and Constraints: Editing 4K on a Windows PC
One of the biggest roadblocks in modern video production is hardware limitations. High-resolution footage—such as 4K video from a smartphone, crisp 60fps files from an action camera, or massive files from a commercial drone—requires immense processing power. If you try to drop these files into a heavy, resource-intensive editing suite on a standard consumer laptop, your system will likely freeze, stutter, or crash entirely.
Before diving into performance optimization, there is a hard boundary line to establish: VSDC is strictly native to Windows. If you are working on macOS or Linux, this software is entirely off the table.
Furthermore, to process modern codecs and high-resolution timelines stably, you practically require a 64-bit installation of Windows 10 or Windows 11. While the developer’s legacy documentation still references an ancient compatibility list reaching all the way back to Windows XP and Vista, running modern configurations on obsolete operating systems is highly discouraged due to security issues and critical memory limitations.
The development team behind the VSDC free video editor chose a highly optimized path. The software is remarkably lightweight, requiring minimal system memory and processing overhead compared to heavy industry giants. The secret to this performance lies in how the software processes data. It features optimized rendering paths and offers manual control over preview resolutions. If your computer begins to struggle with a complex sequence heavy with effects, you can lower the playback preview quality within the monitor dashboard. This reduces the strain on your CPU and RAM during the editing process without affecting the final, full-resolution quality of your exported video file.
Furthermore, the software supports extensive codec compatibility out of the box. You do not need to spend hours transcoding your footage into edit-friendly formats before starting a project. However, an honest evaluation requires a major caveat here: while you can import highly compressed raw codecs like H.265 natively, editing them directly on a budget PC will eventually cause timeline playback to become sluggish. For a truly fluid 4K editing experience without lag, using the software’s internal proxy file creation tool—which generates lightweight editing clones of your heavy clips—is highly recommended.
Navigating the Learning Curve
Every piece of powerful software has a trade-off, and for VSDC, that trade-off is its user interface. When you open the program for the first time, you will not find the slick, minimalist, hyper-modern aesthetic common in trendy consumer apps. Instead, the interface resembles an engineering tool or an advanced database like Microsoft Excel or a CAD application.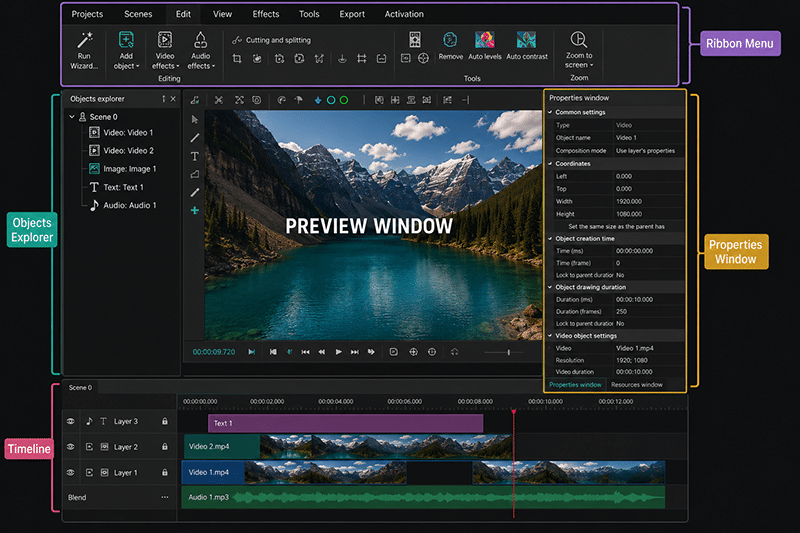
This layout can be incredibly intimidating for beginners. The top ribbon menu is packed with deeply nested settings, and the properties window on the right side of the screen updates constantly with dense technical data regarding coordinate positions, scale percentages, and color values. It does not hold your hand, and it does not hide its complexity behind colorful icons.
New users often run into a specific point of confusion regarding how the timeline manages objects. Because it is a pure non-linear system, when you add an element like a text box or a transition, the software may generate a brand-new track layer just for that single asset. If you are not organized, your timeline can quickly become a towering stack of twenty distinct layers, making it easy to lose track of minor edits.
To push past this initial friction, you must approach the software with a specific mindset: accept that it is a professional toolkit rather than a casual toy. Once you spend an hour or two learning where the core functions live—and how to use the properties panel to manually input clip dimensions and positioning—the interface transitions from confusing to highly efficient. The density of information on the screen means you rarely have to dig through hidden submenus to make micro-adjustments to your footage.
Free vs. Pro: Do You Actually Need to Upgrade?
While the core software is exceptionally generous, the developers offer a Pro upgrade version for a flat annual rate. It is important to look at exactly how features are partitioned today so you do not buy an upgrade you do not actually need.
| Feature / Capability | Free Version | Pro Version |
| Watermarks on Export | None | None |
| Max Export Resolution | 4K / 8K UHD / Unlimited | 4K / 8K UHD / Unlimited |
| Hardware Acceleration | No | Yes (Full hardware encoding/decoding optimization) |
| Audio Waveform Display | No | Yes (Visual sound graphs on timeline) |
| Motion Tracking | No | Yes (Trajectory assignment to titles/masks) |
| Video Stabilization | No | Yes |
| Masking Tools | Standard Shapes | Advanced Custom Masking & Special Effects |
| Chroma Key | Standard | Advanced HSL Mode |
The Bottom Line: Looking at how robust the free tier has become for standard cuts, transitions, and multi-layer compositions, the vast majority of everyday creators will never actually feel the need to cross over into the Pro features.
Reviewing the official technical partitions reveals that the Pro upgrade acts as an accelerator for complex tasks rather than a barrier to general editing. Free users retain access to full-resolution, watermark-free exports across almost all major multimedia formats. However, projects that rely heavily on audio synchronization will face friction because visual audio waveforms on the timeline are locked behind the Pro version, forcing free users to cut audio entirely by ear.
Hardware optimization is another key dividing line. The free version processes effects and encoding through highly optimized CPU paths. Upgrading to Pro unlocks full hardware acceleration using your dedicated graphics card (NVIDIA, AMD, or Intel). For creators handling immense multi-layered 4K timelines with heavy, overlapping visual effects, this hardware leverage significantly scales down final rendering times. The Pro tier also moves advanced mathematical tools like video stabilization, precise non-linear parameter curves, tracking trajectories, and custom clipping masks over to the paid side of the engine.
The Landscape: VSDC vs. DaVinci Resolve
When evaluating the VSDC free video editor as a budget-friendly alternative to paid creative subscriptions, it is impossible to ignore the massive footprint of DaVinci Resolve. Resolve is widely considered the king of free, non-linear video editing software, offering professional-grade color grading and audio tools across Windows, Mac, and Linux, completely for free.
If DaVinci Resolve offers so much power without a paywall, why should a creator choose VSDC? It comes down to resource demands. Resolve is a massive, enterprise-level program that requires a heavy, modern workstation to function at peak efficiency. While Blackmagic continues to introduce excellent optimizations for lower-end configurations, a budget computer lacking a dedicated graphics card with ample VRAM will still struggle with high timeline lag or failed renders on dense, unoptimized 4K timelines.
VSDC occupies a highly unique middle ground: it provides advanced non-linear layering and custom parameter control, but handles those workflows using a fraction of the hardware resources, making it the superior choice for creators who lack access to top-tier computer hardware.
Verdict: Is This Software Right for You?
The software successfully eliminates the barrier to entry for creators who want to build advanced projects on older or less capable machines. However, it requires a clear trade-off between power and simplicity.
Choose it if:
-
You are running a standard Windows laptop or a mid-range desktop PC that struggles with resource-heavy production suites.
-
You want absolute creative freedom to layer assets, build custom graphics, and adjust advanced parameters manually—and you are willing to tolerate a steep initial learning curve.
-
You refuse to pay a monthly subscription fee but still require crisp, high-resolution 4K output without an obnoxious watermark plastered over your hard work.
Skip it if:
-
You work on a Mac or Linux operating system (where platforms like DaVinci Resolve or native apps are required).
-
You want a simple, automated, drag-and-drop mobile-style editor that does the creative work for you.
-
You do not have the patience or time to spend an hour navigating an old-school, data-dense interface to learn the ropes, or you absolutely require visual audio waveforms to slice your clips.
Ultimately, the VSDC free video editor rewards curiosity and technical patience. If you are willing to look past its utilitarian interface and invest a small amount of time into learning its unique timeline mechanics, you will gain access to an incredibly versatile creative production engine that costs you absolutely nothing.
Appendix: Your First 10 Minutes (Quick-Start Workflow)
If you have decided to take the plunge and test the platform yourself, follow this streamlined, four-step guide to bypass the interface confusion and get your first project rendered smoothly.
Step 1: Project Setup and Parameter Matching
When you launch the software, click on the Blank Project icon on the start screen. A project options window will appear. Do not just hit “Finish” blindly. Take a moment to look at your source footage properties. If you shot your video on a smartphone at 1080p and 30 frames per second (fps), configure your project settings to match those exact numbers. Matching these settings from the very beginning prevents strange black borders, unexpected cropping, or frame pacing issues later on.
Step 2: The Import and Canvas Layout
To bring your media into the project, navigate to the left-hand vertical toolbar and click the Add Video icon (or use the Shift + V shortcut). Once your file is selected, a small pop-up window will ask where to position the clip on the timeline. Choose “From cursor position” and click OK. Your video will now appear on the canvas and within the timeline at the bottom of your screen.
Step 3: Master the Split and Trim Tools
One of the most common tasks in video editing is cutting out unwanted pauses, mistakes, or dead air. To do this cleanly:
-
Left-click and drag the timeline playback marker to the exact moment where the unwanted footage begins.
-
Ensure your video layer is highlighted on the timeline.
-
Look up at the top menu bar under the “Editor” tab and click the icon that looks like a pair of razor blades (Split into parts).
-
Move the marker to the end of the mistake, hit the split tool again, select the isolated middle chunk on your timeline, and hit the Delete key.
Step 4: Exporting Cleanly Without Watermarks
Once your edit is complete, click on the Export Project tab on the top ribbon menu. Choose your target platform profile, select your destination folder, and click the red Export Project button located on the secondary ribbon toolbar. Note that because you are using the free software tier, an informational prompt will appear reminding you of Pro features. Simply click the Continue button at the bottom of that window to bypass it, and your project will render out instantly at full quality with zero watermarks.
Technical Resource Information
For deep-dive setup guidance, configuration profiles, and platform requirements, you can access the comprehensive operational guidelines on the Official VSDC Feature Documentation website.